1. What are the types of manufacturing monitoring systems?
The main manufacturing monitoring systems are the following:
- Process monitoring: warns the operator when the parameters of a given machine deviate (for instance, excessive increase of the temperature), the operator then has to make manual adjustments.
- Control system: same as process monitoring except that the correction is being made automatically.
- Inline quality control: checks the quality of the parts/products within the production process, removes them if defective and sends information to the control system for a potential correction.
The rise of these new systems is in line with the Industry 4.0 evolution that aims to minimise scrap rates and strive for zero-defect production.
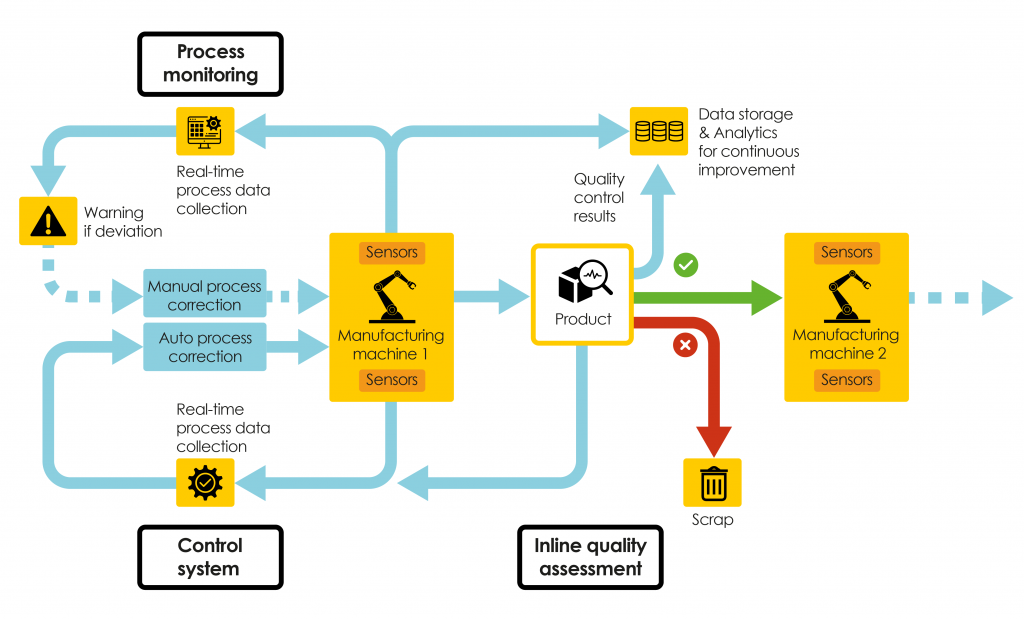
Keep reading to find below all the details regarding each of these systems.
2. Process monitoring
What is process monitoring?
Process monitoring, in a factory environment, aims to collect process data (temperature, pressure, etc.) for the different production assets and display them on screen in real time. If ever operators notice some deviations (e.g. the temperature for a given machine is too high), they can react immediately to pause the process and make corrective actions to make sure to keep on producing flawless parts and products.
How does process monitoring work?
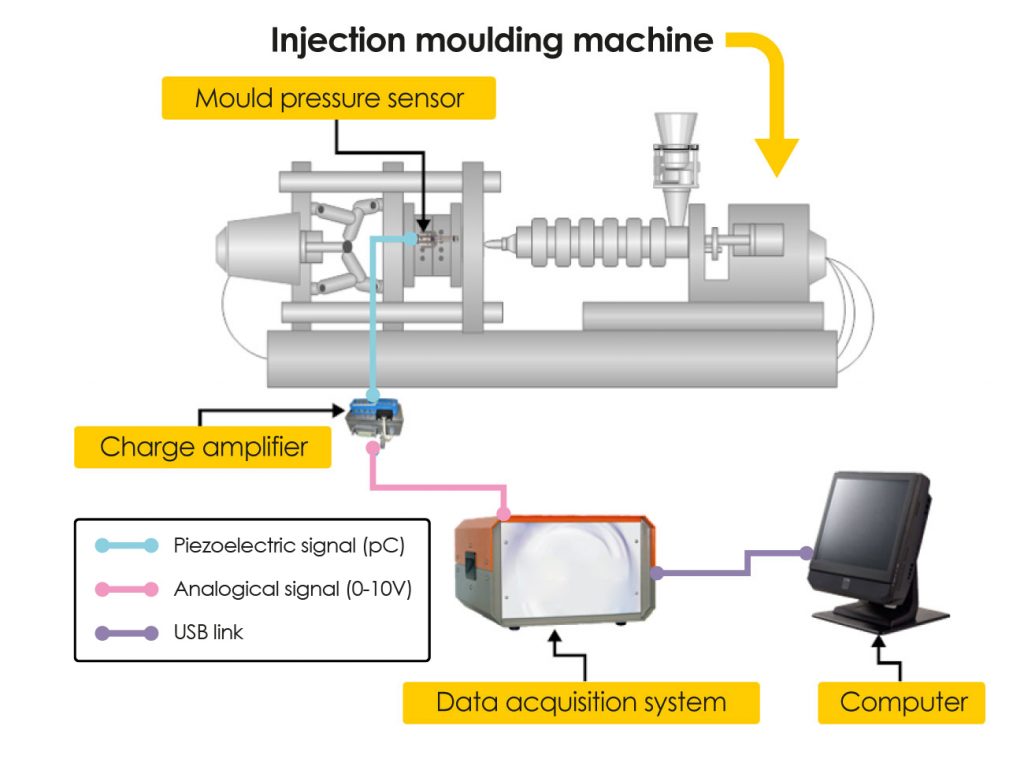
Process monitoring relies on the implementation of sensors in the whole production process. These sensors are of different kinds depending on the parameter to be monitored:
- Displacement sensors (to measure distances)
- Induction sensors (to make sure two parts are no longer in contact)
- Pressure sensor (to measure pressure)
- Temperature sensor (to measure the temperature, it can be done with either a thermocouple, a pyrometer, or an InfraRed Camera)
- Etc.

The implementation of these sensors, as well as the data collection they allow, are the outcome of a various-step process:
- The first step consists in identifying the significant process parameters that can affect the expected quality features.
- Define the process setpoint ranges for producing a good part (that is to say the range of values the significant process parameters can be equal to, to be sure of the quality of the part).
- Define the suitable sensors to be connected to the production process. They can be embedded in the machines in order to:
– measure the value of the significant process parameters in real time,
– collect data related to each produced part for traceability purposes (each part is associated with the specific values of the significant process parameters of a given machine). - The collected data can be analysed (in real time or later) for process improvement. For instance, setpoint ranges can be redefined following the quality inspection of the parts.
What benefits does process monitoring bring?
Process monitoring gives operators a warning whenever the value of the key process parameters is no longer within the range that was previously defined to guarantee that the output is not flawed.
Since such information is given in real time, operators can react fast in order to make corrections.
NB: The correction is not automatic. The operators have to pay attention if ever a warning message is being displayed and then make any corrections themselves. The correction can take some time but definitely not as much as if the issue had not been identified immediately.
Without any monitoring, one can only hope that the process parameters will never deviate. Nevertheless, if ever they do (e.g. because of the wear of a machine), bad parts will start being produced without workers even realising it (at least for a little while). In the worst-case scenario, defective parts are sold and it’s only when hearing customers’ complaints that the factory realises it.
So to conclude, we can sum up the benefits in three points:
- Cost reduction and improved resource efficiency (since fewer defective parts are being produced, fewer raw materials/purchases are needed)
- Improved customer satisfaction (since overall product quality increases)
- Increased productivity (since more non-flawed products are being produced in a given period of time)
3. Control system
What is a control system?
Process control can be considered as an improvement of process monitoring. Not only is process data collected and analysed in regards to the setpoint ranges defined previously, but it also triggers a correction in case of deviations.
With process monitoring, the operator makes the correction manually.
With process control, the system makes the correction automatically.
How does a control system work?
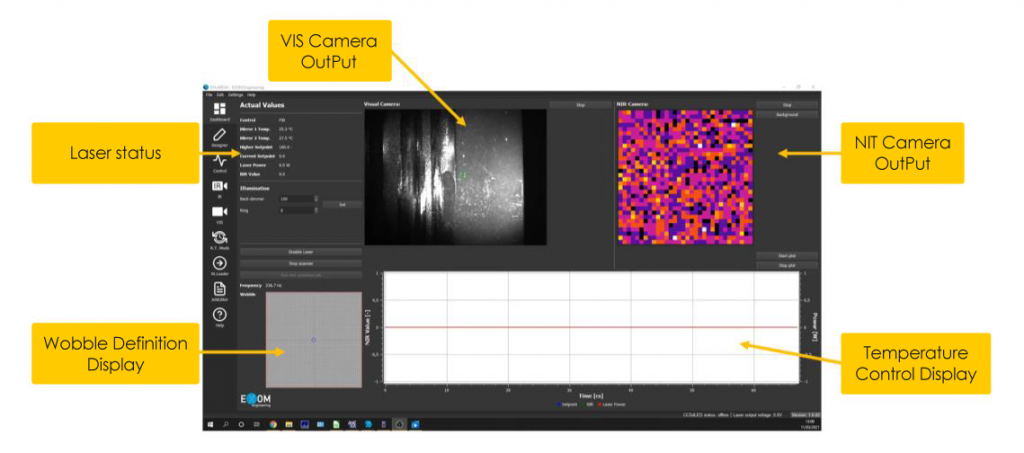
Besides the whole sensor setup that characterises process monitoring, process control also features from a software perspective a control algorithm (based on either artificial intelligence, simulations, or a statistical model).
The latter can send, straight after spotting a deviation, instructions to the hardware setup – in this case, actuators (robotic arm, proportional valve, air cylinder, etc.) to make the necessary adjustments (decrease the temperature, the pressure, etc.).
No human intervention is required.
What benefits does a control system bring?
The benefits that stem from process control are the same as those stemming from process monitoring. They are even more visible as even less time passes between the moment a deviation appears and the moment it is corrected. As a matter of fact, the correction is being made instantaneously.
So once again, the benefits are the following:
- Cost reduction and improved resource efficiency (since even fewer defective parts are being produced whenever a deviation occurs)
- Improved customer satisfaction (since product quality has increased)
- Increased productivity of the equipment (since more non-flawed products are being produced in a given period of time)
Finally, it is also worth noting that such a system frees time for the operator. He or she doesn’t have to manually re-establish original parameters and can focus on whatever task that needs human intervention.
4. Inline quality control
What is inline quality control?
Inline quality control is the last of our manufacturing monitoring systems. Unlike the ones mentioned above, it does not focus on the well-functioning of a machine but rather on the quality of the product.
It analyses and validates the quality of a manufactured part within the production flow. It therefore allows the early detection of defects. Flawed parts are removed from the production process before they are integrated into the final product.
In some cases, quality control can feed a closed-loop control of the process and thus automatically provide correction of process parameters (which then makes it a very complementary process with the ones explained above!). In short, product information can correct machine parameters.
Besides, such a process automatically stores quality related-data. The data can later be analysed for constant quality improvement.
Inline quality control is an all the more appreciated mechanism as many processes are not able to implement a monitoring system (such as the ones explained above) that covers the whole production and even so, such systems cannot always prevent defects since identifying their causes is difficult.
How does inline quality control work?
Quality control can be implemented following these steps.
At a development stage:
- Define the product quality specifications (geometrical, aesthetical, functional characteristics). In short, what are the features to take into account when defining what makes a part a good part?
- Define the criteria of acceptance for each quality specification. In other words, at what point can we say that a part is defective or not? What is the tolerance that the manufacturer has regarding dimensional properties, functional performance, etc.?
- Build the right Non-Destructive Testing[1] (NDT) process to analyse inline the quality specifications with the defined level of tolerance of the parts.
At an implementation stage: implement the automatic inspection of the parts in the production line thanks to NDT.
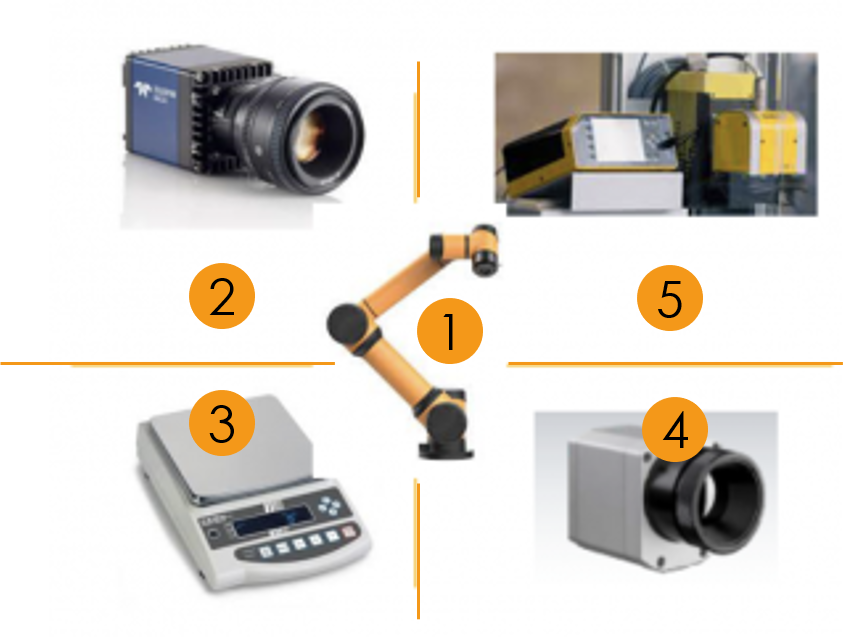
1) Cobot that places the part on each of the control stations around
2) Thermal imaging camera (to control temperature)
3) Weighing scales (to control weight)
4) Vision camera (to control surface flaws)
5) Engraving machine (to engrave a traceability code on the part)
What benefits does inline quality control bring?
Inline quality control allows a given factory to tend towards zero-defect production for the following reasons:
- It is a complementary layer of security to process monitoring and a control system in order to guarantee the quality of the final product.
- The automatic inspection made by the non-destructive testing (NDT) process is extremely reliable, more than any visual inspection often performed with the naked eye.
- It prevents the propagation of defects in further manufacturing stages without interrupting the manufacturing process since a robot automatically rejects defective parts in case of non-conformity.
- It controls 100% of the parts, it’s a huge advantage since in general only a few samples are analysed (statistical control).
As a result (and once again), we have:
- Improved customer satisfaction (customers receive their products faster and with higher quality guarantees)
- Cost reduction and improved resource efficiency (since defective parts are automatically kicked out of the production process which means that there are no “wasted” final products)
- Increased productivity (operators do not have to manually sort a production lot which can be very time-consuming)
5. Implementing manufacturing monitoring systems
Are you interested in implementing manufacturing monitoring systems for your processes and products? Check out our Plug & Produce Modules page.
- Process monitoring: modules 1 and 3.
- Control system: modules 4, 5, 7, 9, 13 and 17.
- Quality control: modules 2, 6, 11 and 18.
Some of the modules have specific production functionalities (tape laying, laser joining, assembling, etc.) and come with integrated manufacturing monitoring processes. Others are entirely dedicated monitoring and control modules that can be plugged to any production process.
You can express your interest in these modules by simply dropping your email on the homepage (“Test our agile manufacturing solution” section at the very bottom).
[1] Non-destructive testing (NDT) refers to an array of inspection techniques that allow inspectors to collect data about a material without damaging it.
